by DanR as March 26, 2023
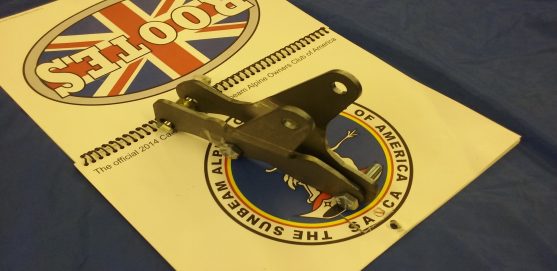
I have created this bit of documentation for those of you that are wanting more power and maybe cruising the Highways at modern speeds. Even perhaps cooling your trips with an Air Conditioner or perhaps enjoying Electric Power Steering (EPS) like I have done. When rolling you also need to stop, and for such a need I added a Rear Disc System to my Blue Boy V6 which is also available in kit.
These are my suggestions for the best and perhaps most economical way of installing a FORD 2.8 V6 engine in your Alpine.
This documentation is in no way complete, but a lot better than what I had to start with. It is updated on occasion due to recommendations that I and others have proven to be worthy.
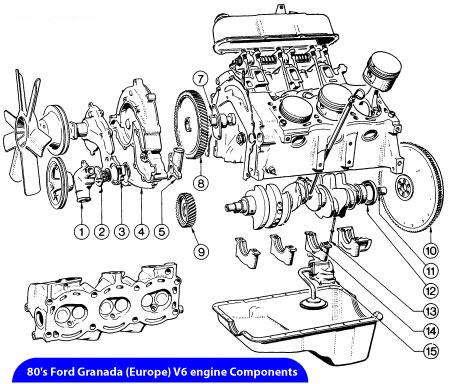
The Ford 60 degree V6 engines referenced here were designed in Cologne, Germany and became known as the Cologne 60 degree engine. Just remember the Cologne engine is all “metric”. We will likewise be working with the 1974 & 78 Mustang II and other interchangeables such as: the Pinto, Mercury Capri, and Mercury BobCats, the 1983-86 Ranger/Bronco II’s and some Aerostars. I have found some ‘79 &’80 Mustang & Mercury Capri FOX Bodys also have these engines, flywheels, and maybe bellhousing that are acceptable for this conversion. The early 2.8’s are common with the other 60 degree 2.9 & 4.0’s except for one major characteristic, that being the Siamese exhaust ports on the 2.8’s. This design is said to be especially fitting for the Alpine conversion as an implant just because of the exhaust port design. One other distinct and difficult piece of engineering is the differences in the water pump designs of the early and late 2.8’s. So far only the early 2.8’s from ‘74-’79 have the correct timing covers and water pumps applicable for this conversion. If you elect to utilize the later 2.8’s just make sure you find an early “74-’79 timing cover. The front sump oil pans fitted to the ‘74-’78 Mustang II will need to be converted to rear sumps (the later 2.8’s Ranger and Bronco IIs have them) because of the location of the crossmember.
The Cologne 2.8 V6 is a natural fit for the Alpine. Removal of the original Alpine engine mounts is the only necessity with the exception of widening of the transmission tunnel in some cases, so you will not be butchering your Alpine.
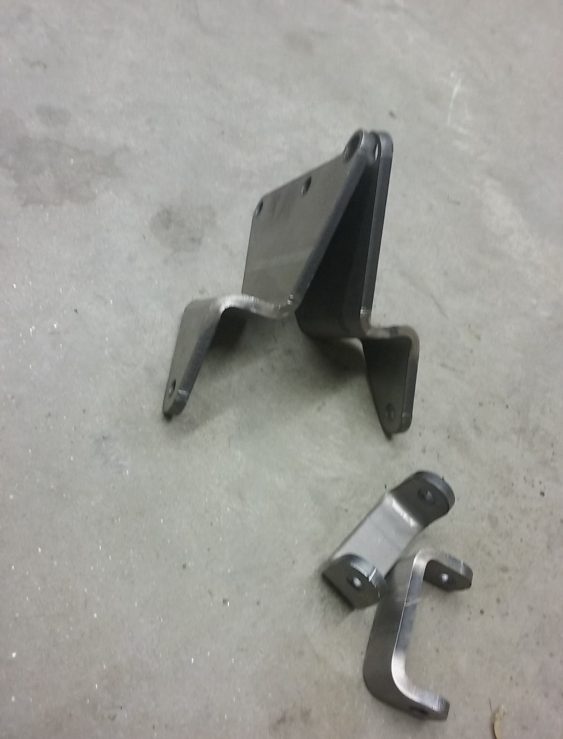
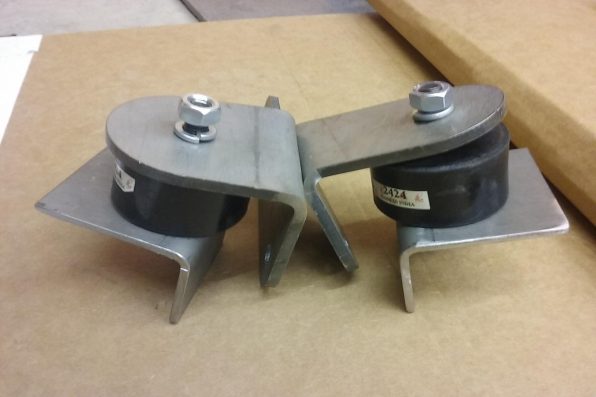
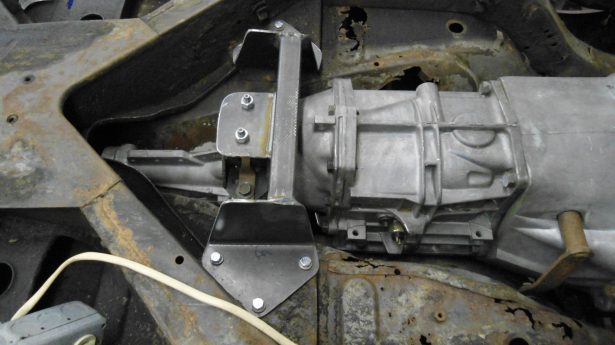
Installation is made easy with the use of my two piece engine brackets consisting of:
(1). A top bracket (right and left side) is bolted to the engine utilizing 10 mm 1.5 bolts;
(2). The two Anchor 2424 rubber biscuits connect the top pieces to the bottom brackets and
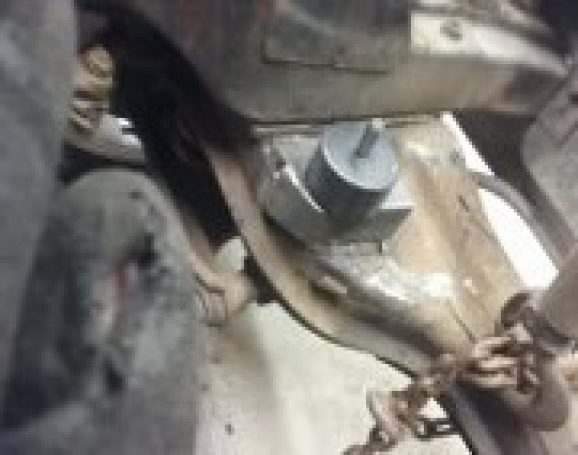
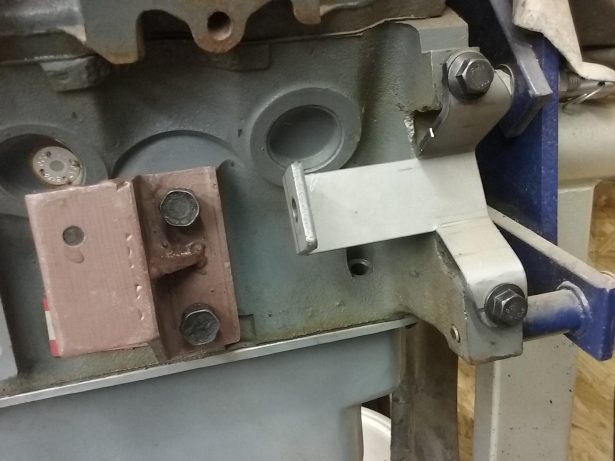
(3). The two bottom pieces (rh & lh) are welded to the crossmember and serve as a “Stop or Catch”, keeping the engine from being placed too far forward, thus allowing adequate spacing between the radiator, the fan and the steering system.
See PIC below for the “Stop”. Before welding the bottom piece to the crossmember, bolt the headers to the engine and adjust spacing between headers, the frame, and steering components. (See Engine Mounts).
In order to help you find various parts or find answers to some questions, this PDF Documentation is arranged in alphabetical order listing the individual components or
individual pieces utilized in the conversion.
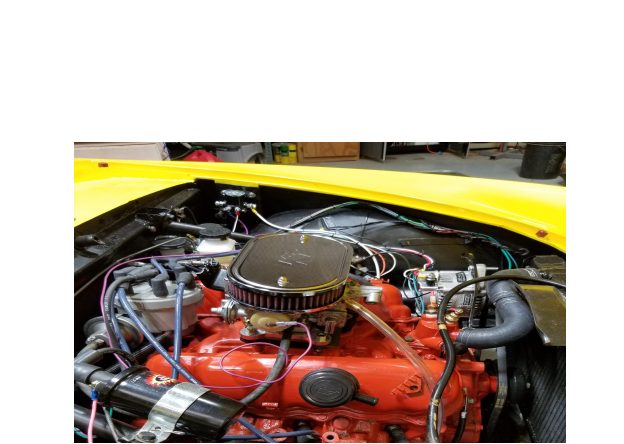
AIR CLEANER: Various choices are available, here the 9” Spectre P/N 4770 is a nice choice on SD Pace’s 2.8 V6. I prefer to run a much smaller round top 10”x2” RPC R2282.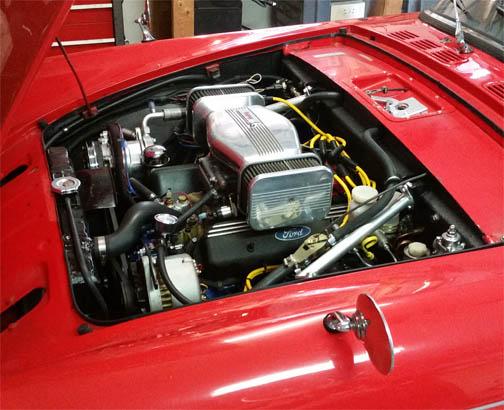
He is running an A/C unit too. Not shown is his Electric Power Steering (EPS). Smart Guy:)
Top hose connecting from the water neck on the intake is routed to the top left on the radiator is one such modification recommended for a better fit down below with the modified Thermostat housing.
See Alpine Radiator Modifications for 2.8 V6
AIR COMPRESSOR (2 piece) BRACKET: Comes with Adj arm. An option for you Guys & Gals wanting to have a “Cool”Alpine. PIC’s are available for How to do the A/C.
ALTERNATOR: I like the A/C Delco single wire mainly because it is available in about any parts store if you need one while away from home. Another popular one is the Hitachi 14231 (Advance Auto) from a 1973 Datsun Truck. Available Amp outputs 35 and 50.
A fellow member of SAOCA, Tom H, has written instructions to convert to a 1 wire Alternator for your Alpine.
Hitachi 014231 Alternator wiring rev 2.pdf
ALTERNATOR BRACKET w/Adj Arm: Comes in 2 pieces and allows for precise alignment of your alternator and belt. PIC shows brackets in place w/bolts.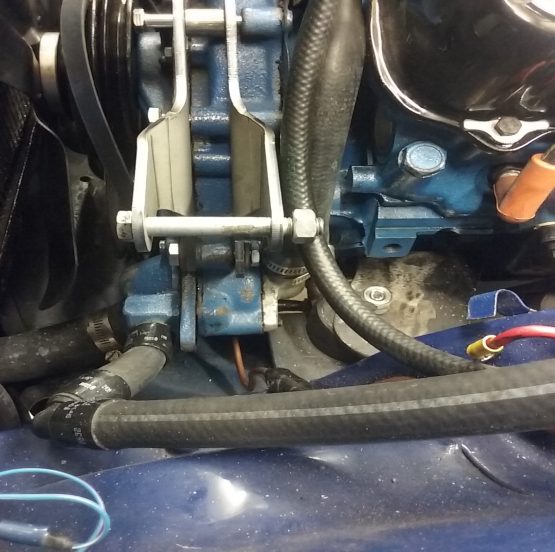
BATTERY CABLE to connect the Solenoid to the starter is a Standard A32-1L 1 gauge 32” long. Used to connect the starter solenoid on the firewall to the starter.
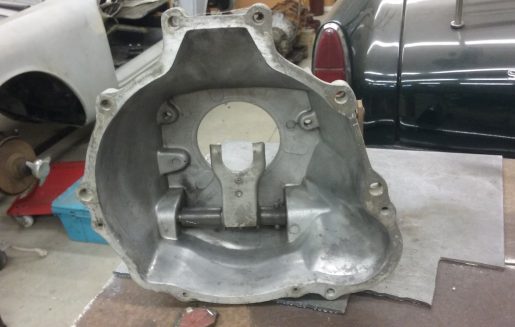
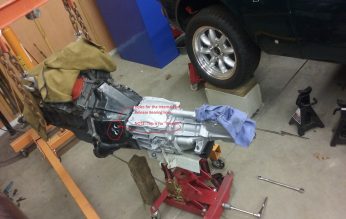
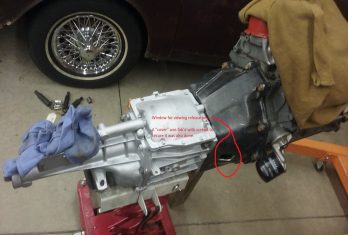
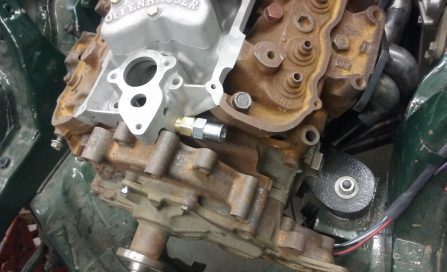
BEARING RETAINER/Housing: Needs to be shortened to 4” (the length of the 5.0 T5). The outside diameter needs to be milled to fit snugly in the opening of the Mutt II bellhousing. The Bellhousing ID is 4.850″. To mate with a slip fit, the Input Bearing Retainer Large diameter should be turned to 4.846″ +/- 0.001″. See PIC. Recommend you use steel, not the aluminum housing.

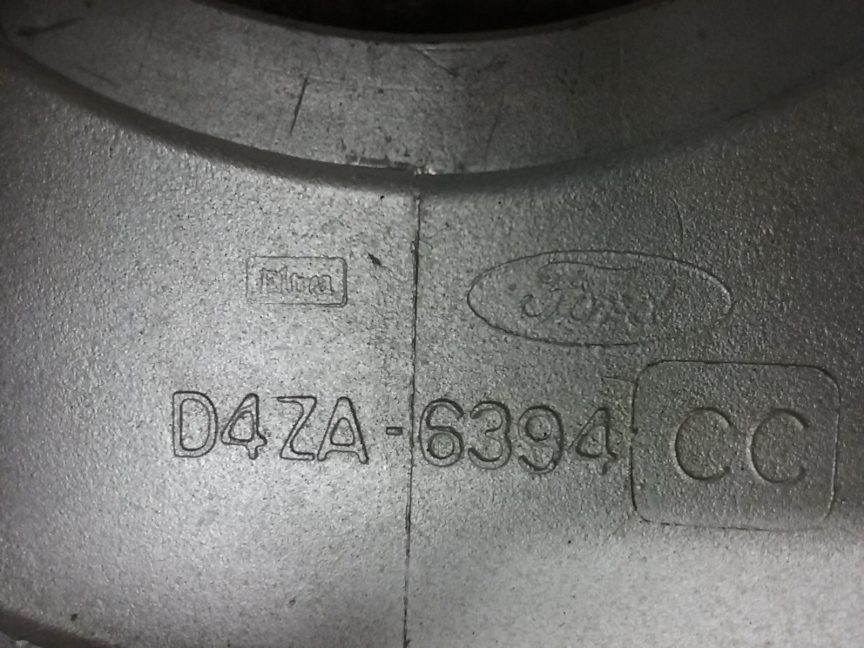
BELLHOUSING: The correct bellhousing P/N D4ZA-6394 CC: It’s made of aluminum & the most defining feature is the bell crank, an arm/lever on the driver side of the bellhousing to operate the clutch release bearing.
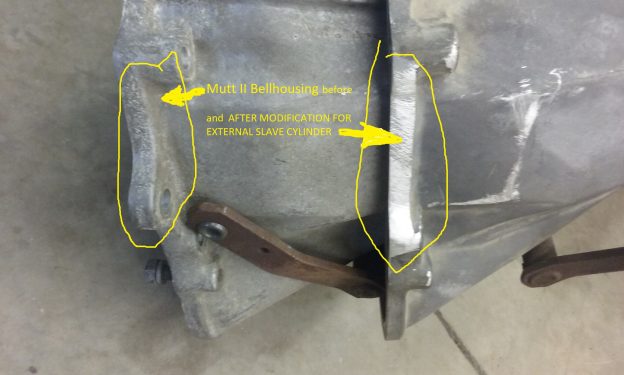
Pictured above are two (2) Bellhousings showing the area (on the left) to be removed. PIC on the right shows clearance for the Hyd Slave Cylinder mechanism.

The clutch lever is a must for the V6 conversion, unless you go with an internal hyd release bearing or convert to an Automatic transmission. The area in the “Orange” circle is where the stock clutch cable release connection was located. It must be removed to provide clearance for an external slave cylinder to function.
If you elect to go with an internal Hyd release bearing here’s a few tips in the following two pictures. Two of the Hyd Clutches sources that work: Ram Clutches And Tilton Racing
CAM: What choice of cam to use will bring lots of opinions. I followed the flow when I first started my conversion! I bought a cam that was recommended as a mild to hot street only to find out later that it was a “Full Race” cam. Not good for what I wanted. After about four months of trying to get my V6 to idle below 1200 – 1500 RPM (zero vacuum). I gave up and called Delta. The REP Quickly stated it was a “BIG FULL RACE CAM with zero vacuum below 900 RPM”. If you want a “Hot”, “Big”race cam, Delta Cams has what you need. If you want a nice street cam, COMP cams has the one I went with! Crane; ERSON and a few others can fix you up nicely too!
Highly recommend a mild cam for street and everyday driving and maybe gettin’ it on occasion. Jim Nichols (260Alpine on the SAOCA Forum) is an excellent contact to help with the Cam of your Choice.
CARBURATION: You have several options. Run a stock setup 2bbl or a 4 bbl with OFY intake pictured below which is a very good performer. Also Ray Griffin has 3 two’s on his V6 (Burton Power). Below is a PIC of the Carb Holley 390 4 BBL and Ofy intake with throttle linkage. 
Several V6 Guys are now using the Stock 2 BBL Intake or some modified version with the EFI by Holley. Even MicroSquirt. Go to the SAOCA Forum Modified section for more on fuel options.
I found two items that work well for me when utilizing the OFY 4BBL intake and the 390 Holley Carb, it is the RPC R2334 Throttle Cable Kit
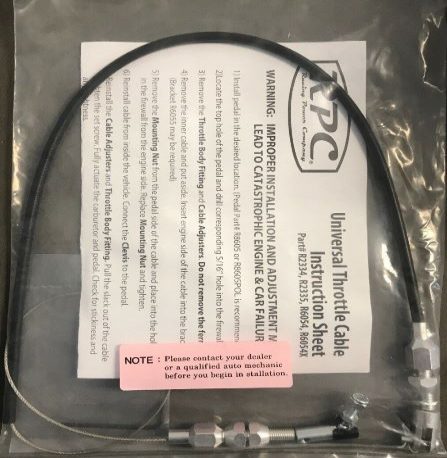
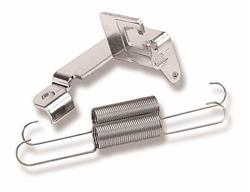
and a Holley Throttle Cable bracket 20-88, pictured below:
Carburation Con’t: Installation of the OFY intake manifold requires some special attention. It is made in two pieces, a top for the Carb Base and the bottom that connects to the heads. The PIC’s that follow may be of great benefit to the installer. You will need four (4) Metric bolts, one of which is shorter than the others. The shorter one is to be installed in the right rear hole. In the lower PIC there is a rib that runs between the holes, notice the empty hole, there is a raised area about a ¼” taller than the opposite hole. This is for the shorter bolt.
Offenhauser (Offy) 4 BBL Intake and Correct Bolts for 2.8 V6
CLUTCH CYLINDER AND BRACKET INSTALLATION: Make sure the bleeder valve on the cylinder is pointing upward (high point). See PIC’s for positioning! You may need to fabricate a clevis. A clutch pedal stop has been recommended to prevent over extending the clutch when the pedal is fully depressed. However, I adjust my clutch to catch near the floor and have never had a problem.
CLUTCH DISC: Mustang II has 10 splines and is 9 ½” dia which is compatible with the T5 input shaft.
CLUTCH DISC INTERCHANGE: 1974-’79 FORD MUSTANG II, All USA V6 2.8L 171 cid 4 speed manual; 1979 Mercury Capri all USA V6 2.8L 171cid; Mercury BobCat; Pinto. Here’s a website: https://kyclutch.com/ that does clutch work recommended by Paul A.
CLUTCH RELEASE/THROWOUT BEARING: With the Mustang II bellhousing, flywheel and pressure plate, use the throw-out bearing for a Mustang II four speed 1974-1978. Check the fingers on your pressure plate. If the fingers
are curved on the ends, use a bearing that has a flat contact surface. If the fingers are flat, use one with a curved contact surface.
Clutches that operate with an internal hydraulic release bearing are also utilized in the Conversion. If you should go with an internal Hyd Release bearing, the external slave bracket, slave cylinder, the Mutt II Release arm and the mod to the Bellhousing is not required. It is also possible to not extensively modify the tranny tunnel.
Here are a few suppliers. McLeod racing; Ram Clutches and Tilton Racing
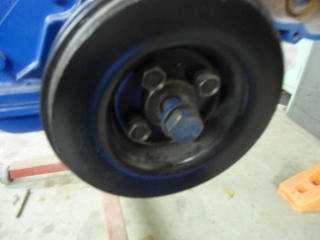
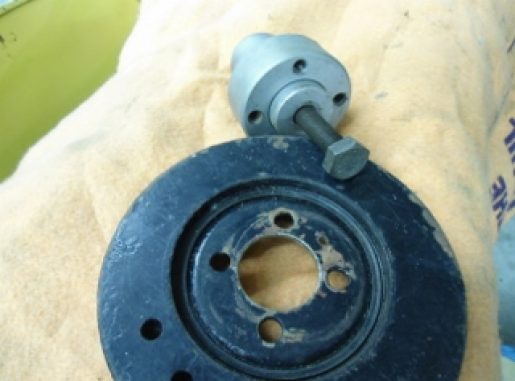
CRANK PULLEY/BALANCER: 315 H 077 74 & D4ZF-6312-AA (See PIC’s)
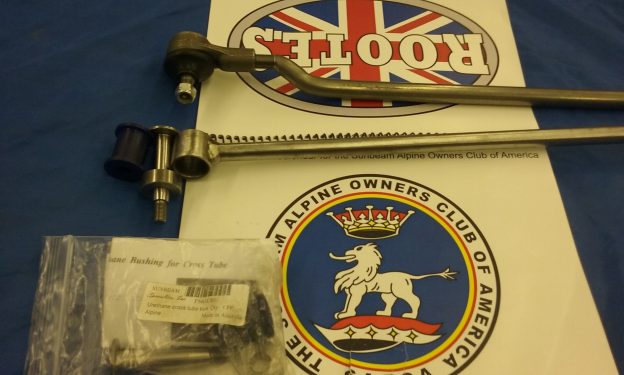
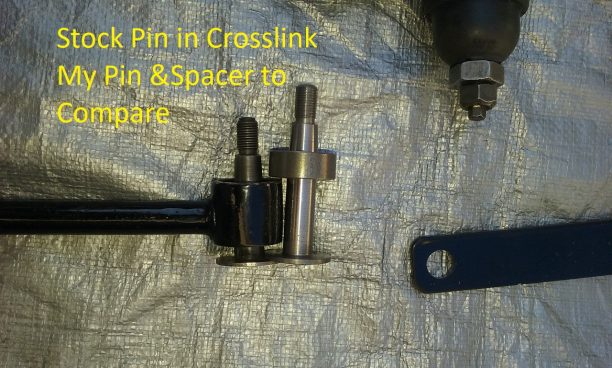
CROSS LINK REPLACEMENT : My designed cross link PIC’d below is one piece formed in a Hyd Press w/o welding, has threaded ends for tie rods. It comes with 2 new tie rod ends & lock nuts. Adjust to match your stock linkage, approximately 21” center to center of the tie rod ends. Front end alignment is recommended.
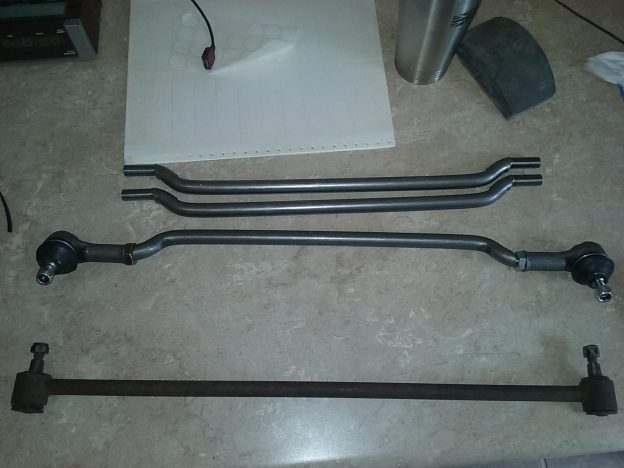
CROSS LINK MODIFIED : an option less costly but just as effective. Bolts and Spacers (4140) used with your stock Cross link bar to replace stock bolts/pins. Recommend you purchase replacement bushings from one of the Sunbeam Alpine suppliers for your stock crosslink bar/rod with this alternate option pictured below.
|
|
|
||
DIP STICK FOR YOUR V6:
“To make mine, I simply removed the flare from one end of a 3/8″ steel tube, and put a slight chamfer to it. Using my broken one as a guide I put the correct bends in it (by hand, carefully) and cut it to the correct height. Then I used a Dremel to grind the bracket off the old unit and smooth the inside of it. There were only 3 spots where it was attached to the tube. I slipped the new tube into the block, and located the bracket. I used a Sharpie to mark the bracket location, and [had] it tack welded at my local exhaust shop. The whole thing could be fabricated if you don’t have the original bracket, just eyeball it. And if you are unsure of the length, change the oil and filter, run the engine, and cut down the pipe (with a tubing cutter) until the full mark lines up with your stick. One coat of Ford blue (or black, if you have an oldie) and you’re ready to roll.” https://www.fordification.com/tech/dipstick.htm
DISTRIBUTOR AND IGNITION PARTS & WIRING: OEM Type parts are available as aftermarket parts. I found a new DuraSpark II Ignition Harness Part Number 30812 from Painless Wiring Accessories that makes things simple and with less mess.
a. A Distributor clamp from Mr Gasket P/N 9860 and a lock down bolt Kipling Metric 8.8.
b. Mallory or DuraSpark Distributor Ignition Control for Mustang II Unit 1976-78 from Standard Motor Products LX203T.
DRIVE SHAFT: Searching a Salvage Yard is mostly futile. Paul A on the SAOCA Forum had a custom drive shaft made using 2.5”x.065 tubing, NEAPCO 2-2-899 flange yoke and NEAPCO 10433 U-joint. Machining, welding, balancing and taxes came to $189.26. Another great contributor to the V6 project is Jim Nichols with information on the common C4 Automatic yoke for the FORD T5. As an added note, check your yoke by fitting it in the tailshaft “before” installing the engine and tranny in your Alpine. The first time for me, I had everything installed and was about ready to fire up the V6 before I attempted to hook up the driveshaft. To my surprise the yoke would not slip into the tailshaft but an inch or so. No amount of effort would make it work short of removal of the engine and transmission. Discovered the tailshaft bushing was the wrong one!
ENGINE: 2.8 V6 FORD (COLOGNE) Mustang II 1974-1978; Mercury BobCats; Mercury Capris; & Pintos have correct bellhousing; flywheel/clutch pack; & timing cover. I found some ‘79 & ‘80 Mustang’s &Capri’s also have the correct 2.8 V6’s. The ’83-86 Ranger/Bronco II, AeroStar’s 2.8 V6 engine and heads will work. The timing cover will not due to the thermostat configuration, nor will the water pump, its snout being too long. The ’79 Mercury Capri is good except the bellhousing is a bit different! If you are going with an Automatic, moot point!
Very similar to the ‘74-78 Early 2.8s and Ranger/Bronco II Late 2.8s. Notice the staggered exhaust ports in the head pictured? The Mutt II has Siamese designed exhaust port where two are “side-by-side”. The Siamese are what has been the choice for the Alpine conversion thus far.
Be extremely careful tightening the bolts (metric) because the ears are aluminum.
10. Flywheel – Mutt II or and interchangeable for the manual transmission. Different, if you elect to go with the Automatic tranny. Also, different in years ‘74-’78 and ‘83 – ‘86.
Note: Modern Drive Line in Boise, ID is supposed to be making flywheels, pressure plates and clutch disc for our 2.8’s – ask for Paul
11. Crankshaft pilot bearing – Depends on the transmission you choose. I sometimes have the Adapters available.
12. Oil seal – Rear
13. Oil pump drive shaft – Check on some later notes when installing.
14. Main Bearing Caps. You will need to modify the Main bearing cap bolt to “add” a stud to the head of the bolt in order to secure the oil pump pick up tube brace. I had a stud silver soldered on! Ranger/Bronco II bolts w/stud may be too long for early series 2.8, so beware!
15. Oil Pump – Recommend a High volume – Sealed Power High Volume (same as Melling HV) SEP 22441163V (74-78 Mustang II/83-86 Ranger 2.8L)
16. (Added) Oil Pan – Mustang II has a front sump – will not work in this conversion. Get Ranger/Bronco II 2wd rear sump pan & pickup. ‘79 Mercury Capri and some early Foxbody Mustangs have the correct rear sump. Don’t know about Aerostar! AutoZone usually carries them. Same as Pictured above.
17. (Added) OIL Filter Adapter (Not shown) – FORD P/N FMS-M-6880-A50 Right angle ¾”-16 threads. Other FORD Dealers: a. FMC Fotz61621a Gasket b. SPO E3tz6749a O ring c. SPO E3tz6a636a Copper Washer. These adapters are easily found in salvage yards on 2.8, 2.9, & 4.0 V6’s.
18. (Added) Block plate(s) – The Timing cover to the engine block plate is pictured above but not numbered. It is located and pictured between the Item 7 Cam Thrust plate and the engine block. The Engine to Bellhousing Block Plate is neither numbered nor pictured. Pictured above is the Automatic on the left with the small window/plate and the manual type on the right. Make sure you have the correct one for your application. An Auto plate can work for manual but not suitable vis -à-vis.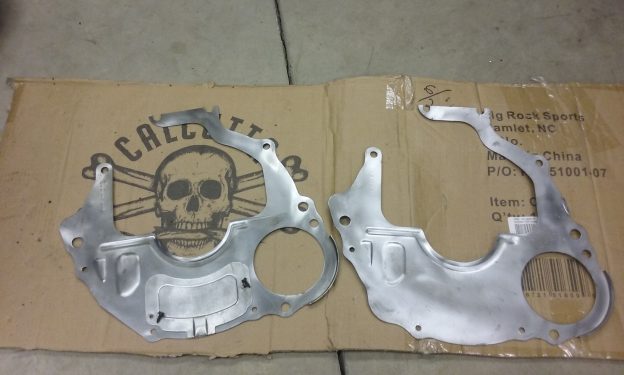
NOTE: Here is a link to a better understanding on the 60 Degree V6 Engine: Cologne V-6 Information for Capri owners
Engine Mounts: Consisting of 4 pieces, 2 upper & 2 lower each side w/Anchor Rubber Biscuits P/N 2424 (1 ea side). PIC below shows the Mounts for a good look at the “stop or catch” that contacts the crossmember and locks the engine from going too far forward. 
 PIC above shows the Engine Mounts rightside up. As pictured they are facing toward the radiator in the mounting position.
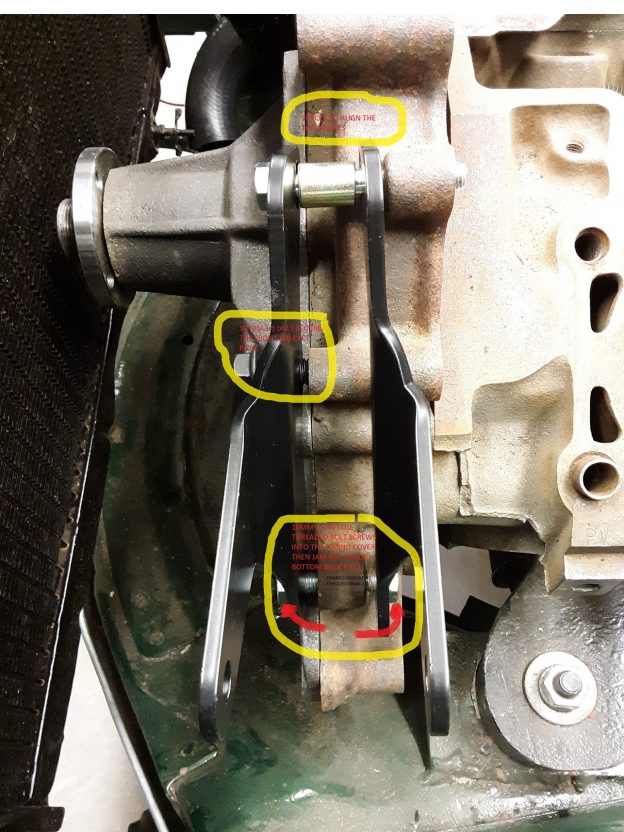
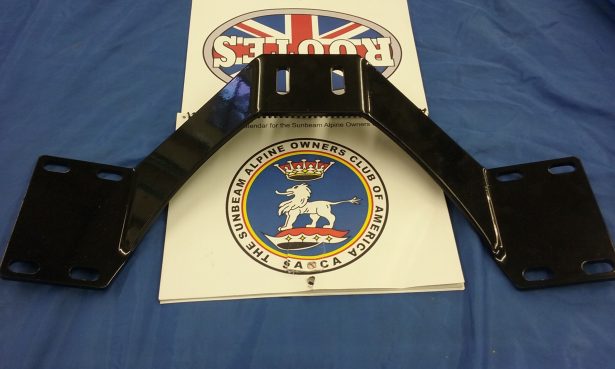
ENGINE MOUNT BRACKETS & WHY DanR is offering Engine Mounting Brackets for the 2.8 V6 Mustang II engine installation in an Alpine. The engine mount brackets I bought in an available “kit” at the time, sat off the back edge of the crossmember. A solution given to me was to weld a piece of exhaust pipe for support. Not liking that idea, I designed a bracket with a curved “lip” that catches on the backside edge of the crossmember and serves as a “stop” which keeps the engine from moving too far forward. I have fitted several engines mated to the later model Mustang T5; C3/C4 & A4LD transmissions into different Alpines utilizing my Conversion Components & my Straight Back headers without any notable differences. I have at least 1/2 to 1″ clearance between the fan and radiator on my cars. The one with the 1/2″ clearance has an A/C unit installed which requires an additional pulley (doubles) for the water pump and the harmonic balancer. So they work fine!
For ease of installation, I recommend a “mock-up conversion assembly” consisting of the engine block; engine mounts w/Anchor 2424 biscuits; timing cover; water pump; fan; modified thermostat housing; radiator modified w/upper connection top left; bottom right connection w/ 90 degree elbow underneath the bottom of the radiator pointing directly back toward the opposite side; a set of heads w/ or w/o valves etc.; bellhousing; Transmission (of choice) w/correct tranny mount bracket; and My straight back headers. Alignment of the headers and steering is most important prior to welding the bottom engine mount pieces.
EXHAUST SYSTEM: The headers that came with the “kit” I bought when I first started the V6 Conversion were not to my liking, they stuck out the sides right behind the front wheels (15 – 20 degrees) which would be fine for drag racing. Routing of the exhaust pipes was very difficult to get up and under the Alpine for normal driving. The Alpine is already a bit low to the ground, so I wanted headers that would run straight back similar to the Tiger exhaust system and not hang down creating a possibility for speed bump collisions and such:) See PIC below of mine….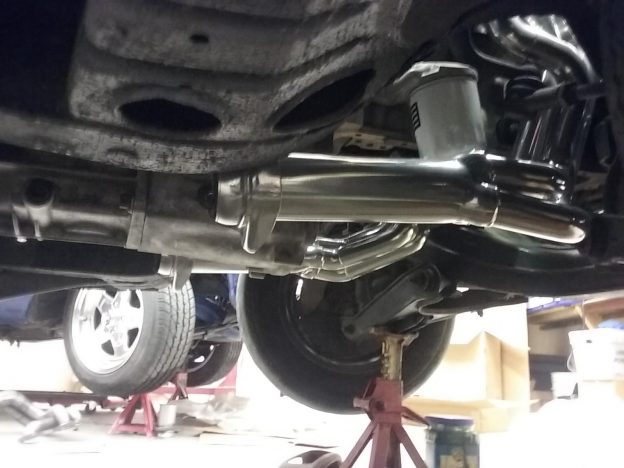
Pictured above you can see they are tucked up inside the frame providing plenty of road clearance without fear of speed bumps and curbs. Here they are fitted with ball & sockets for ease of installation and coated (optional).
FAN: Stock Ford P/N D4ZE-8600-AA four blade from a 4 cylinder Mustang II works nicely on two of my cars. One is sporting an A/C unit. No Engine heating problems in Hot Sunny SC. See PIC’s. 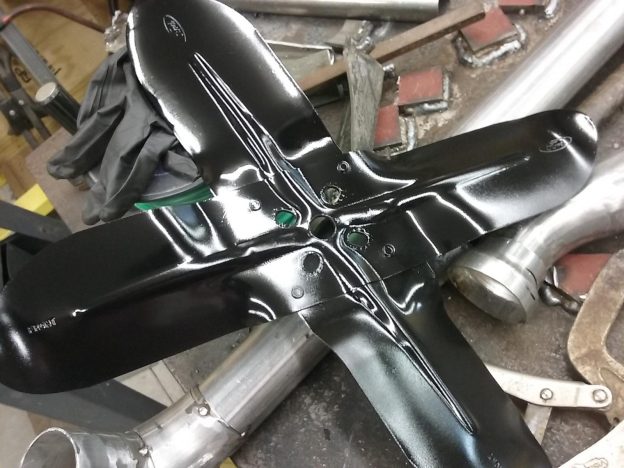
Another Fan Option is one offered by fellow V6 ‘er Dennis Michaliga, a Volvo modification which I’d be using except for my AC double pulley requirement.
FRONT END: Rebuilding the front end is not necessary just because you are installing the V6 (approx. weight increase 75 lbs).
FRONT SUSPENSION & Weight of Alpine: I spotted some of SC Transport Police near me and asked if they would weigh my Blue Boy ’67 SV Alpine ST with the 2.8 V6…. Surprise! They were very interested in seeing and weighing it! I pulled into a flat, hard and level surface area and they pulled their scales out for me to drive up on!
Here are the results:
Front left: 620 Front right: 600 Total Front: 1220
Left rear: 550 Right rear: 550 Total Rear: 1100
TOTAL ALPINE WEIGHT 2.8 V6 w/T5 2320
That is without occupants! It did have my A/C and Electric power steering (EPS) which probably contributes 70 lbs of the 2320?
FUEL Block Plate: PIC’d Below: Oval shaped plate and the Upper Gas Pedal Rod.
GAS PEDAL UPPER ROD: PIC’d above and below: 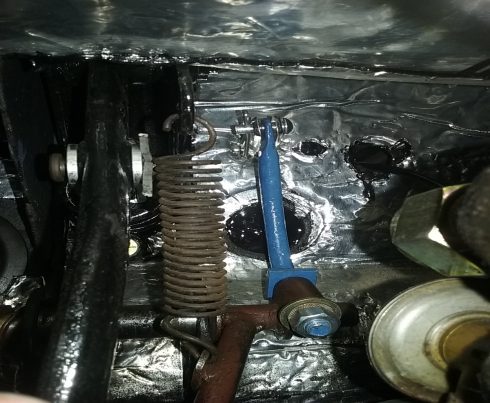
|
Works well with the RPC throttle linkage. Harmonic Balancer Bolts: NOS OEM Ford Crankshaft Pulley Bolt D4ZZ-6A340-A 1974 Mustang A few left $15.00 each
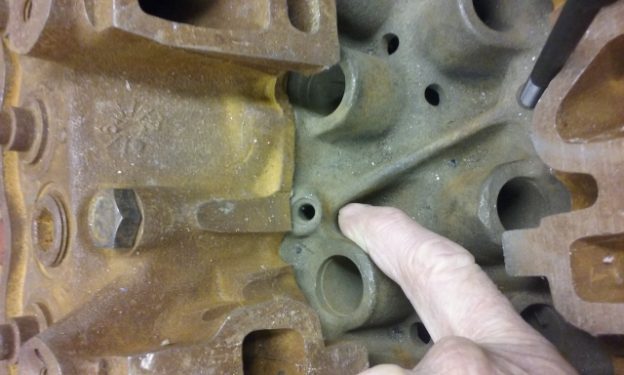
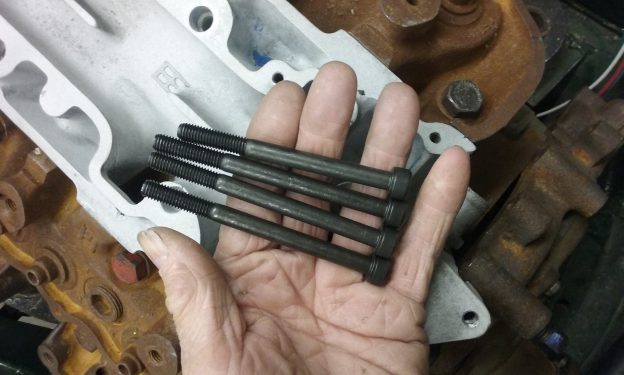
HEADER BOLTS: Remember the Cologne Engine is Metric. My header bolts are 10mm 1.5 x 20 and 25 in length 12 point heads 12.9. Metric studs 20 mm in length can also be used for the slotted bottom exhaust flange . See my recommended Head Work (modification) for the emission ports.
|
|
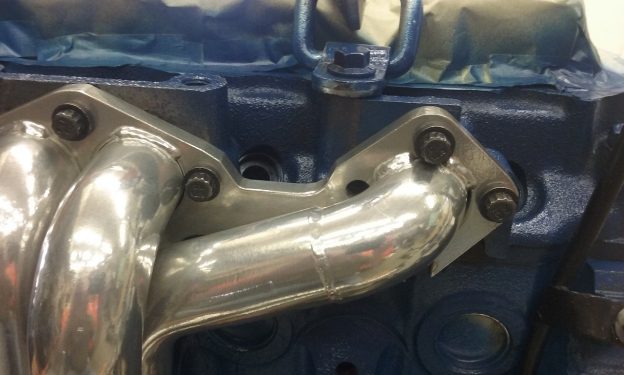
Header Gaskets – Suggest using with my recommended head modification to emission ports the Hooker P/N 10828 with your headers.
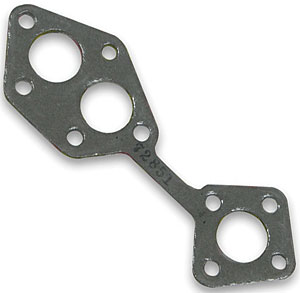
NOTE: Make sure you get a gasket that has the division between the “Siamese” exhaust ports as pic’d above! You may also “notch” the bottom gasket holes to match the slots in the header flange, which makes for an easier fitting when installing the headers. Remember to always run taps into the head to clean the threads. If you can run the header bolts in by hand it will make installation of the headers a pleasure. Otherwise….yep! You will most likely call me names:)
HEAD WORK: Recommend: New 2.9 intake and exhaust valves, hardened exhaust seats; Port & Polish will enhance breathing and make major difference in the 2.8; Trim gaskets to match ports. Instructions are available for drilling water passage which improves the life of the heads (Cool Heads prevail):) This PIC shows several things that might be of interest to you. First, to the left of my hand & between the exhaust valves you can see two small holes (⅛”) which are pilot holes for the water jacket passage modifications to the Head that will aid in cooling thus saving from cracking; Late model 2.9 Valves are installed; The Headers are my 1st Generation Straight Backs with ⅜” thick Flanges as recommended by Sven Pruitt, they are not yet “notched”. As you can see notches are in the flange between the headers and the head for demo purposes. All of my headers will come with these notches so you can secure the bottom of the flanges to the heads, thus, eliminating potential exhaust leakages.
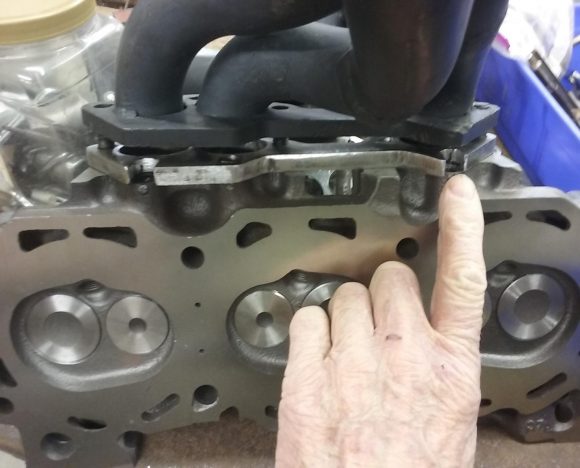
It is noted by several V6er’ s that the holes drilled for cooling do not always get into the water passages unless you pay close attention.
I “slotted” a set of the jose headers for a friend so it too can be done for my other Darksider Friends:) Remember, do the head work now! Later you will be very satisfied you did.
PIC’d below are the plugs being used to “fill” the emission holes. These “plugs” are available in most machine shops.
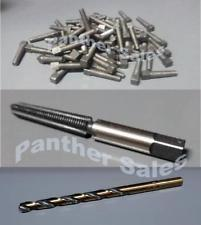
Pictured below are the plugs before being cut off and ground smoothly.
Followed by drilling and tap work (10mm 1.5 threads) to a depth of no more than ¾”.
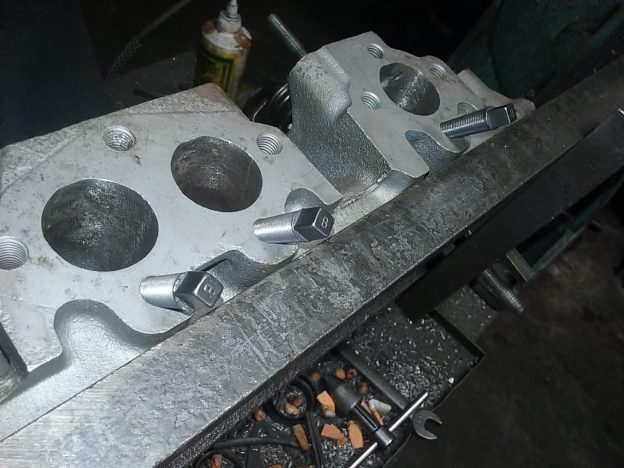
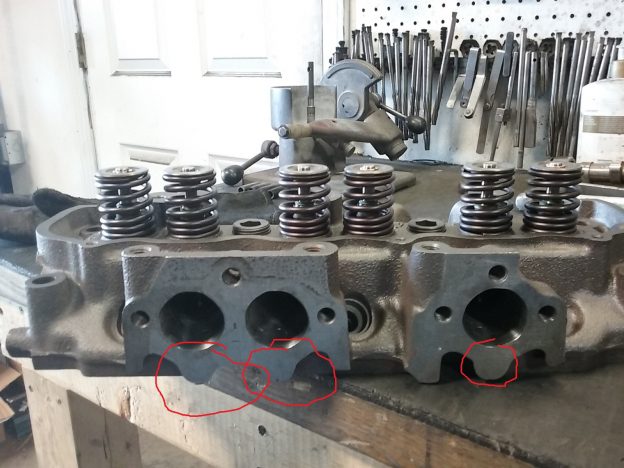
Next step is to drill and tap the Emission/PCV/Air holes in your heads (matching the factory bolt hole threads) for use of 10 mm 1.5 bolts or studs NO MORE THAN ¾” deep using your new Straight Back headers or the Hooker 10828 Gasket as a template. Now you can finally tighten “all” header bolts to specs and not fear exhaust leaks:)
HEAD MODIFICATION: Such as larger valves from 2.9 Ford, Port & Polish and improving the cooling is covered more than adequately in the Sven Pruitt Book on How to Modify the 60 Degree Ford V6. Ask if you need info.
HEADERS, STRAIGHT BACK: Designed for better performance, zero ground clearance problems and ease of routing the exhaust system.

Pictured are my Headers with the Ball & Socket for ease of connecting or disconnecting. They will come Raw (uncoated). Please note the Ball&Socket may not be available please ask. They are similar to the Tiger system, not sticking out the sides nor hanging down below the frame.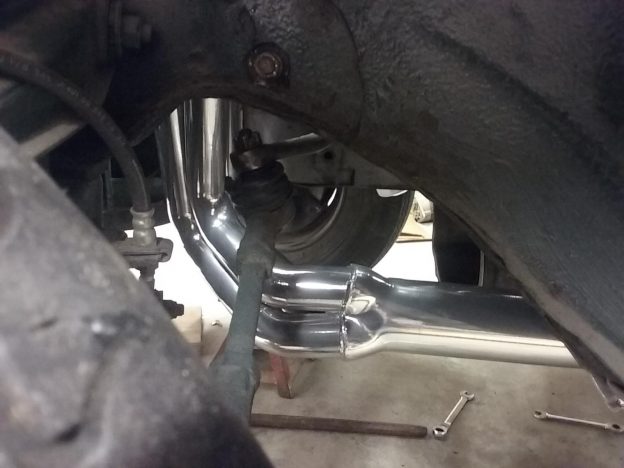
WILL THEY FIT?: I’ve been asked if my Straight-back Headers for the 2.8 V6 will fit on an Alpine with the jose kit? They have been fitted to several Alpine V6 conversions without difficulty. Chances are if you welded a piece of exhaust on the rear of the crossmember to support the jose engine mount, you may need to remove it before welding my bottom mount bracket piece in place. For my GT BW35 that had the jose “nut washer” welded on the back of the crossmember, I simply cut it off and slipped the “Bottom Piece” of my mount bracket with the curved “catch” over what was left of “kit washer” and welded my bottom piece in place without any changes to the Headers, the Steering or Transmission.
HOSE, Water, Heater Bypass, etc 1974-1978 Ford Mustang II Bypass Hose – Dayco 70773 or Gates or ? In the below PIC my Machine Guy welded in a fitting that was adapted to the Bypass hose. Just one means of making it work.

INTAKE MANIFOLD: Several options have been available for the V6 such as running the stock 2bbl; the OFY 4bbl with the 390 Holley Carb; Three twos (Burton Power); even a fuel injection system from the EURO V6’s. Now there are several other options available, such as MicroSquirt and throttle bodies, etc… WIth the cost of the OFY 4bbl now more than $1300, these other options are looking very good.
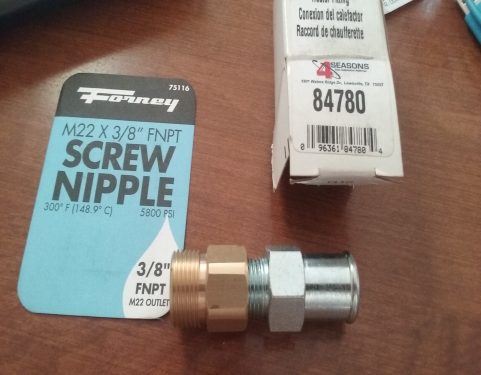
Pic’d below is a Stock Metric Nipple 22MM 1.5 thread that screws into the Intake manifold for the bypass hose. They are most likely corroded like this one and needing replacement.. Replacements are difficult if not near impossible to obtain. Several solutions can be found. See the hose picture above, just below the Temp sending unit where a nipple was welded in place and the ones below for some ideas. 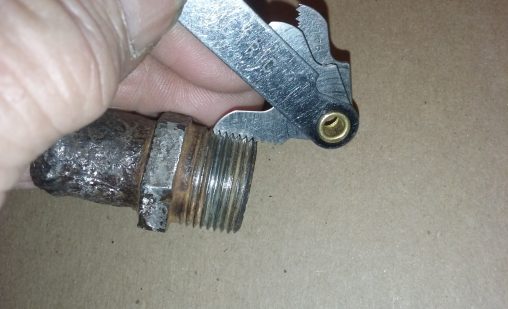
This option gets very tight and needs some additional clearance for the By-pass hose. I actually trimmed some metal from the head (there is plenty there) allowing for the needed clearance.
OIL Filter Adapters M-6880-A50 Adapter, Oil Filter, Right Angle, Aluminum, Natural, 3/4-16 in. Thread, Ford, Lincoln, Mercury, Comes on all Ford V6s, from 2.8, 2.9, and 4.0 & many others. You should be able to find one easily. (FORD oil filter adapter Part number FA141). I usually find them in the Salvage Yards for $15-30 bucks.
OIL FILTER – Recommend a short one for adequate clearance of the headers like the WIX 51348 or NAPA GOLD 1348
OIL PAN: Mutt II’s will not work because of the front sump. If you purchase a ‘83-86 2.8 engine it will have the rear sump oil pan. RockAuto.com and AutoZone sell correct oil pans (Rear Sump)‘83-’86 Ranger/Bronco II. Be sure to use a special rubber gasket with this oil pan and a rear oil pump pick up and the special main cap bolt that has a screw sticking up on the head for bolting the oil pump pickup tube to keep it from fatiguing from vibration and breaking off.
OIL Pickup Bolt (s) a Kippling 8.8x24tpi about 25mm lg
OIL DIPSTICK: There is a small plug covering the rear dipstick hole in the Mutt II engine block. While the pan is off, knock it out and install it in the front hole where the dipstick presently resides. Move the dipstick from the front left side, to the rear left side hole. A Ranger/Bronco II dipstick reads correctly (Remember the rear sump oil pan?).
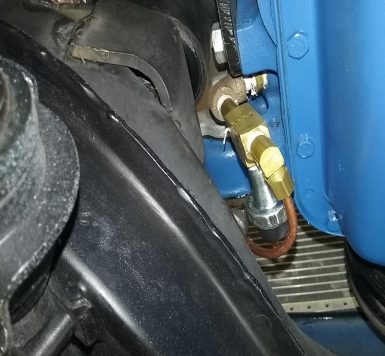
OIL PRESSURE CONNECTIONS: Normally you will find the best connection just below where the manual fuel pump was connected. (Now the Fuel Pump Block Plate) See PIC. Some Conversions have utilized an electric sending unit. I used a 90 degree elbow and a copper line. Very tight, but doable. See PIC. I also utilized a stock Alpine Oil pressure gauge.
OIL PRESSURE SWITCH: Standard P/N PS-64 recommended for emergency shut off pictured above.
OIL Pump Driveshaft: Melling IS-87 – Melling Heavy-Duty Intermediate Driveshafts Summit Racing has them for $8.73. AutoZone also carries them for 9-10 bucks.
PARTs & Numbers for 2.8 V6: These Numbers May be of help – 8546-A FAN BLADE SPACER MOUNT V6; 8600-A 2800 V6 FAN BLADE 74-78; 6B070-A PLATE ASSY 2.8 V6(TIMING COVER & BLOCK); 6A340-A V6 CAMSHAFT PULLEY BOLT; 6023-A V6 TIMING POINTER.
PILOT BEARING/Bushing: I think it’s best to get an adapter to fit your pilot shaft spud 🙂 I usually have the bearing/bushing on hand. Just provide me with the OD of your tranny “spud”.
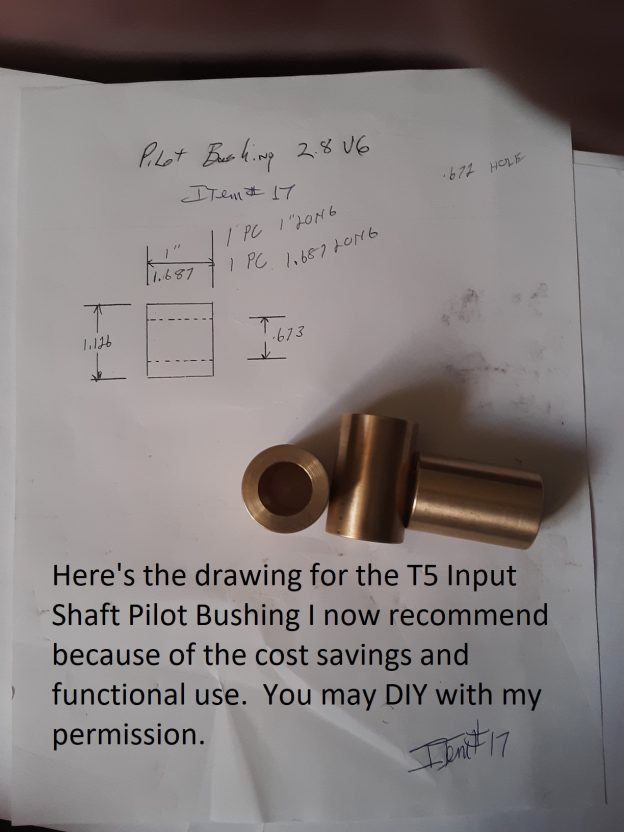
PILOT SHAFT BUSHING/ADAPTER: Your transmission selection “will” determine whether or not you will need an Adapter/Bushing. For sure if you elect to go “Automatic” the adapter is not applicable. The adapter pictured here is rather expensive at more than a $100. I had some made early on in this Project but decided to go with an equally functioning pilot shaft bearing adapter. The bushing listed below is more economical at $55 (current pricing).
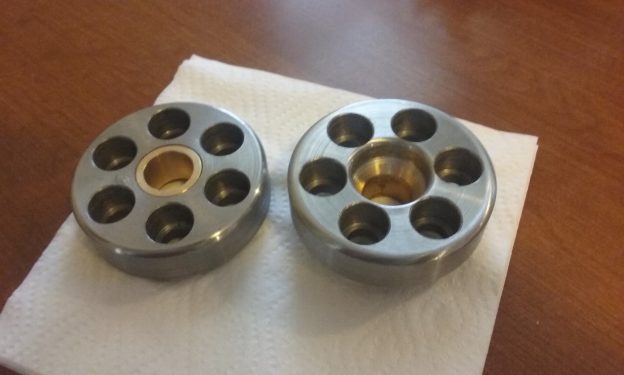
I have these in stock. However, the drawing is provided for you Gent’s that may want to do your own thing.
PILOT BEARING RETAINER/Housing: Needs to be shortened to the length of the 5.0 T5 (4”). And the diameter of the collar also needs to be milled/turned down to fit snugly in the opening of the Mutt II bellhousing. The Bellhousing ID is 4.850″ so to mate with a slip snug fit, the Input Bearing Retainer Collar diameter should be turned to 4.846″ +/- 0.001″. See earlier PIC.
PRESSURE PLATE: Mustang II part number is D4ZA 7563. Team Blitz has been a good source. https://www.ebay.com/itm/Ford-Capri-Pressure-Plate-Cologne-V6-4-Speed-5-Speed/280602800438
Note: Modern Driveline Boise, ID is now planning to provide Pressure plates/Disc/and Flywheels for our V6’s. Ask for Paul
PULLEY: Water pump & pulley part# is D5ZE-8509-AA is the best. Don’t go with the one ending in CA because that is a 302 pulley.
RADIATOR MODIFICATION: Highly recommend you Modify your stock radiator with a heavy duty Copper three row/core & 17 fins per inch, & have the top left connection angled about 10 degrees toward the water neck and slightly 3 to 6 degrees upward. With the bottom connection plugged off & a 90 degree elbow added underneath the bottom of the tank, pointing directly back towards the opposite side. For more detail see: Alpine Radiator Modifications for 2.8 V6
Pic’d below is one of my Radiators modified with top left and bottom right connections. The Radiator Fan shroud I fabricated also helps route the flow of air. I am trying to get some of these made too!. This is the engine side. 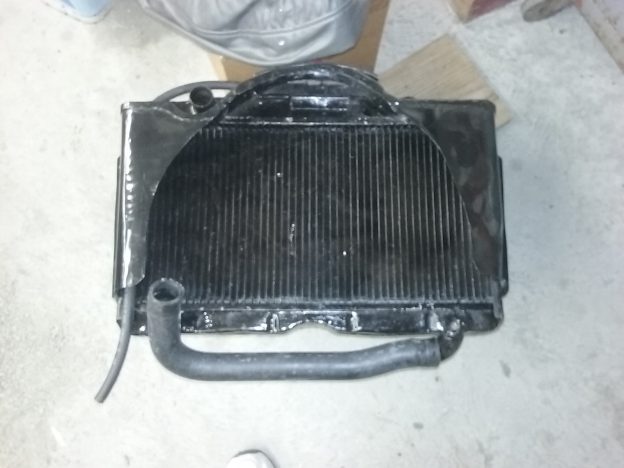
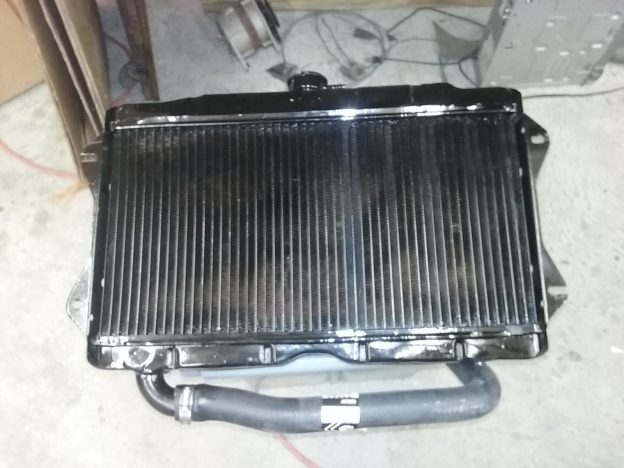
The above PIC depicts a view from the front of the Alpine.

The 90 degree elbow underneath the bottom of the tank makes for a smooth, easy, no hassle connection to the Modified Thermostat Housing ON THE OPPOSITE SIDE OF THE RADIATOR.. Trim the Gates hose 22080 to fit. Of interest also is the drain plug… Move it to THE RIGHT SIDE closest to the outside of the tank facing the engine (Pictured ON LEFT here) so as not to interfere with the hose.
Also in the above PIC is the Modified Thermostat housing with the Heater Option (drilled and tapped with an NPT plug. Cooling Depot Part number 84719 is a nipple that fits the ⅝” heater hose.
There are ideas for using the Ranger timing cover by either moving the radiator forward and down, or shorting the water pump shaft to where the overall length is the same as the Mustang II pump. A modification of the Ranger timing cover hasn’t been found that I know of. The bolt patterns of the two Timing covers match except for the thermostat housings. Still would like to see this timing cover/water pump modified for this conversion. Anyone game?
Radiator Hoses I found to work, cut to fit are: GAT 22356 Top & GATES 22080 Bottom. Note also the other option for the top hose……Gates 21341 if the unmodified water neck is utilized. I have until recently recommended modification of the water neck to point to the left for a simpler connection and routing of the Hoses. Even though it is more expensive, it’s an effective modification that looks nice. But, In an attempt to be both performance minded and cost effective, I recently discovered perhaps a “better” way to route the upper water hose and save dollars!
Rear Axle Options: One option, a Dana 44 from a 1970 Jeep DJ-5. Yes DJ as in 2wd Postal Jeep. It’s 49″ flange to flange and a 3.73 with Trac-Lok. Kinda makes you think about using an 8.8 out of a mustang. My SV Rear axles are satisfactory for me.
REAR END: Depending on how much power you intend on getting from your 2.8 V6, you could keep the stock rear end, thus saving you money and work. The stock rear end is pretty strong, check the ring gear bolts and swap out the soft stock woodruff keys. The SV’s are the stronger! I just changed out the wires to the four bolt hubs. Rear Discs are now available.
REAR DISC BRAKES for the Alpine/Tiger: For a better braking solution I offer a Kit applicable to our Sunbeam Alpines and Tigers.
SHIFTER BOOT: One choice is the

MGBGT. MGB:OEM SHIFTER BOOT & RETAINER w/screws 72-80 MGB
Shock Kit for Series I and II: For you owners of the Series I and II Alpines I have a Kit available to Convert from the stock lever to tube type shocks: Alpine Series 1 & 2 Rear Shock Conversion
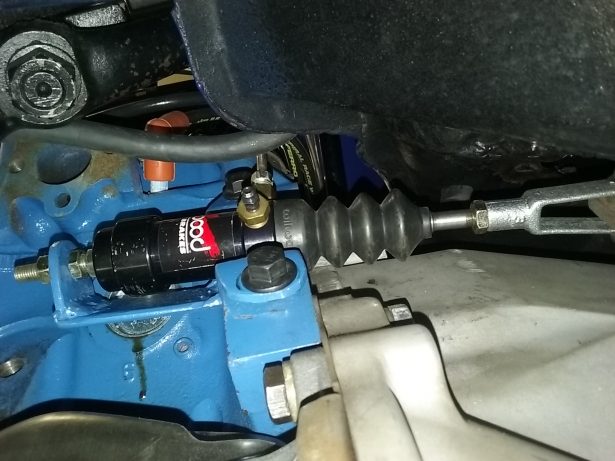
SLAVE CYLINDER MOUNT BRACKET: Comparison between two brackets, the brown one came in the kit I bought. Mine on the right sits further back toward the rear of the engine away from the heat generated by the Headers, hopefully prolonging the life of the Slave Cylinder.
Note that if you elect to utilize an internal clutch Hyd release bearing or an Automatic Tranny, the Slave Bracket is not needed. Please take note the “bleeder” should be on the top side:) I later learned of my error while attempting to bleed the system.
SPEEDOMETER: In order to run a factory Rootes speedometer with the different transmission (T5-five speed conversion), the cable must be changed on the transmission end to fit the five speed. The upper ferrule stays the same and works just fine. If you are using a Tiger speedo, a factory issue or aftermarket Mustang cable of 64 to 66 vintage has the correct connections on both ends and is just the right length. Cactusmasher discovered this recently when He changed His speedometer from Alpine to Tiger.
I had good results with Texas Industrial Electrical (texasindustrialelectric.com) Sent one of my Alpine Speedometers and a matching Alpine cable to them (Steve) to have the transmission gear end fitted to a late model Mustang T5.
TACH: Your 4 cyl needs calibration to the V6. Tom Hayden ( TomH) on SAOCA is the Gent to see.
TIMING COVER Ford part Number 74 TM 6059 AA. Obtain from a Mustang II ’74-78, 2.8 V6 & other interchangeables such as Pinto, Mercury Capri & Bobcats
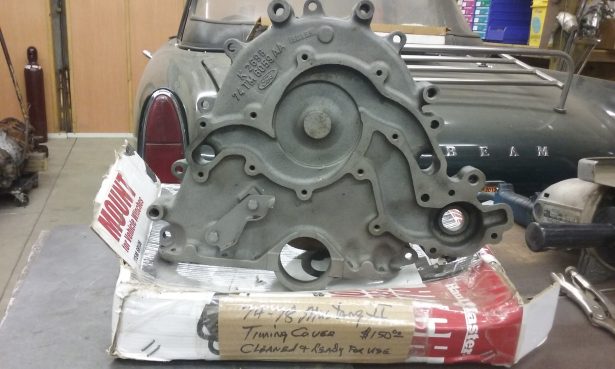
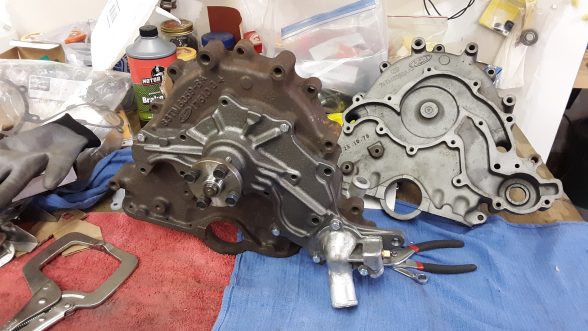
NOTE: Here are two 2.8 V6 Timing Covers, the one on the left is from a late series 2.8 (Ranger/BroncoII) and will not work. The little square to the right on the Mutt II cover has the identifying mark of the correct timing cover for this conversion. The water pumps look alike, but close scrutiny reveals major differences. More down below….
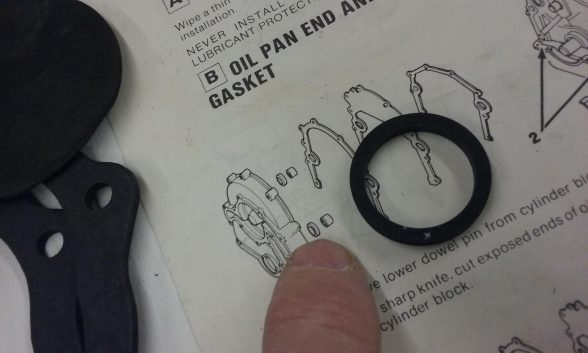
Below is the water pump to timing cover seals (2 of them) and lots of folks forget’em.
THERMOSTAT HOUSING: PIC’d below: Modified by DanR has ¼ NPT plug for heater option 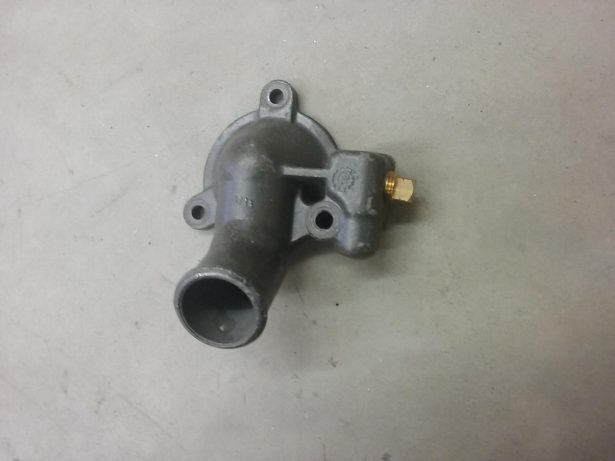
To add the hot water heater connection obtain a Cooling Depot P/N 84719 Nipple ¼ Male NPT w/ ⅝” hose end.
Transmission Bracket (s): Available for T5; C3/C4 and A4LD transmission for Sunbeam Alpine mated to the 2.8 V6. Whether you have a stock 4 spd or the Borg Warner BW 35 Alpine, I have a Bracket for you.
Comments: Hi Ken, I have seen pictures of Dan ́s crossmember and it will work beautifully. I suggest getting one. It will simplify your job a lot. Jose
PIC’d below is my 1st Generation Tranny bracket for a T5 in my ‘65 SIV GT Alpine that came from Rootes with an Automatic Borg Warner BW35. The three bolt pattern is for an automatic Alpine. My later BW35 brackets are laser cut and formed as one piece similar to the 4 speed Alpine style.
 PIC’d above is a Bracket for an Automatic C3/4 transmission in a standard tranny Alpine (see the 4 bolt pattern)
T5 to 4spd Manual Alpine has a 4 bolt pattern, pictured above.
All of my Transmission brackets for BW35 Alpines will be a three bolt pattern. Likewise, all Brackets for the Standard/Manual 4 speed Alpines bolt pattern have four.
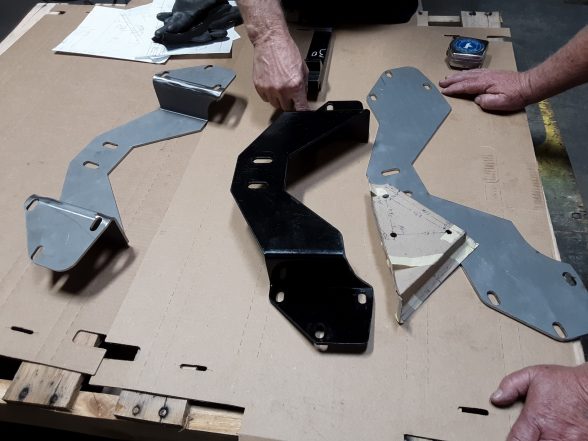
I have another designed transmission bracket with “under floor mounts” to ease the conversion for our V6 Alpines. The next picture is displaying the flat pattern (before bending/forming) and the Cardboard Mockup of the (Under floor mounts), The Black powder coated bracket is exclusively for the T5 in an Alpine factory fitted with the BW35 Automatic transmission, it has a much narrow clearance for the tail shaft housing than the new bracket “formed” with the 3 bolt pattern next to it.
The final results for the “new” “All Transmissions Bracket with the underfloor mounts will/can eliminate several brackets from my inventory.
Take a look at the following pictures:
A look at the next PIC shows the ALL Transmission Bracket as it will bolt into the undercarriage of the Alpine. The “underfloor mounts” are in the same position as they will be welded to the undercarriage/floor/frame.
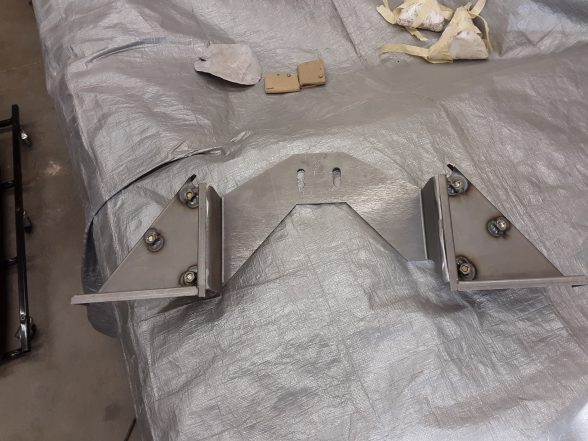
The next picture depicts what the “All Transmission Bracket” and the Underfloor Mounts look similar to when viewing from underneath the Alpine
The next PIC has the undercarriage pictured with the Dual exhaust pointing backwards toward the “openings” in the X-rame. The New All Transmission Bracket has plenty of clearance for routing the dual exhaust past and thru the frame. There are no clearance issues.
The Transmission in this picture is the A4LD. The Bracket will work easily with about any transmission you can put in the Alpine.
It should be noted here that the main purpose of the new design was to allow a single bracket be fabricated that would suffice any need in the V6 conversion and perhaps other conversions. The Underfloor Mounts can be positioned and welded as needed under the floor panels to allow universal positioning.
T5 TRANSMISSION: The chart below identifies various T5 applications and their specifications. Your transmission choice may be a personal preference, availability and or cost. The following may provide you with some fodder…...![]() Note that the Input Shaft Length on some of the V8 models are about 5/8″ shorter than others. A T5 with the 7.18″ shaft requires a Pilot Bearing Adapter to extend the pilot bearing and compensate for the shorter input shaft.
Note that the Input Shaft Length on some of the V8 models are about 5/8″ shorter than others. A T5 with the 7.18″ shaft requires a Pilot Bearing Adapter to extend the pilot bearing and compensate for the shorter input shaft.
COMMENTS: Hi, Dan: The input shafts should be the same length, my trans is a 238, out of a 1996 Mustang with a 3.8 in front of it. I like the gearing on that trans. I made a pilot bearing adapter that pressed into the flywheel, because the input shaft on these transmissions are just a bit short, and will not go all the way into the existing pilot bearing if installed in the way the factory calls for…the original 4 speed had a longer shaft, by about .750″, than the T5. My adapter will press into the existing flywheel, and use the factory pilot bearing.
PS, I did run my motor for 2 years without the pilot bearing adapter…I installed just as the factory recommends…so it will work, I just don’t think it is ideal. Kelly Mathis
Additional Comments: Refer to prior comments about pilot bearings/bushings and adapters
TRANSMISSION SHIFTER: The factory shifter does not have positive stops and the shift forks can get bent. Also the aftermarket shifters have a spring to assist 2nd to 3rd. I have had good luck with the $40 Ebay Mustang T5 shifter. Not too fond of the boy racer colored shift lever. Try to find the silver or black one.
Transmission Rubber Mount T5 1975-1978 Mutt II Transmission Mount – Westar EM-2566…Check the height compatibility with the T5 Transmission Bracket. Might need 2565 or maybe 2784 which is 2 ¾” tall. Alignment in the tunnel will be very close so check for adequate clearance. If you need to raise the mount, it is possible to add a spacer.
Transmission Data on An AUTO for the V6 Alpine: V6 Tranny Data for Auto A4LD 4 speed w/OD identified by “T” in transmission code. Overall length 28.687”. In being since ’86. Newest Version has 5th gear (Computer controlled) Upgrades available in an off road package for manual control.
Google: Will an A4LD bolt to a 2.8 (Advance Adapters). It readily adapts to the V6 60 degree engines.
T5 VIDEO ON BREAK DOWN AND REBUILD IS A GREAT REFERENCE: https://www.youtube.com/watch?v=XREsRG9Y1mU
Transmission Tunnel Modification: PIC’s below are taken from an Article by Jim Ellis on the SAOCA site. Go to this Link: http://sunbeamalpine.org/2009/10/16/alpine-v6-conversion/#more-186
SPECIAL NOTE: If you choose to utilize the internal Hyd release bearing, you can remove the clutch release rod/bell crank from the Mutt II Bellhousing and forgo some of the extensive tunnel modification.
VALVE COVERS – Cologne 2.8 V6 rocker covers: These custom covers are unique by Redmond Metalcasting (jrcast.org). ( I do not receive compensation from jrcast).
Water Neck: The below PIC shows the stock water neck pointing to the right side of the Alpine.
Next PIC shows both angles. (See Radiator modifications for directions and a PIC of the new routing of the upper hose Gates 21341 cut to fit).
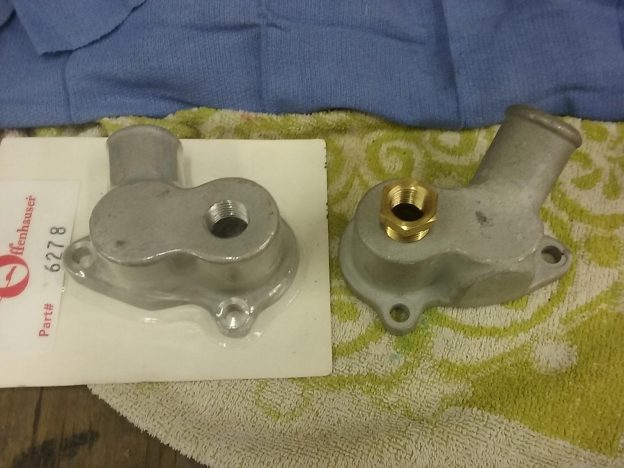
The original Ofy water neck on the left and my modified one on the right. (See also “RADIATOR MODIFICATION”).
Least expensive way to route the upper radiator hose pictured above, utilizing a stock (or Ofy) water neck with a Gates 21341 hose cut to fit and jointed together with a metal pipe. This is getting to be a much cheaper way to route the upper hose due to OFY now selling the water neck for $100 or more.
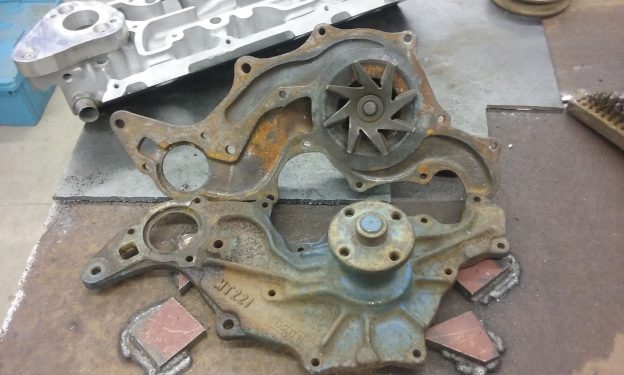
WATER PUMP: Here are a couple used ‘74-’78 Mustang II 2.8 V6 water pumps, note in the lower left of the picture you will see a small square hole, it is a good identifier between the Mustang II and the later 2.8 engines in the Ranger and Bronco II’s water pumps.
If you have comments, questions, & suggestions, please contact Dan Richardson
E-mail: tiger2dan@gmail.com or call 864-554-0814 please leave a message if I don’t answer.
Thanks for looking,
Dan Richardson
123 Richardson Drive
Greenwood, South Carolina 29649
P.S. You may search for additional info at:
2. SAOCA SAOCA Forum
P.S. Pictures are in the PHOTO GALLERY Under Parts, Drawings and Technical for your viewing pleasure….and in DARKSIDE Gallery for the V6 conversion components.
3. The TEAE Tigers East/Alpines East
A nice Article on the “First V6 Conversion” ? C5 – Capri V-6 / Sunbeam Alpine
4. The Sunbeam Experience www.sunbeamclub.com/
https://www.sunbeamclub.com/member/TigerDan.98048/
5. PDF file on Converting your Alpine: https://docs.google.com/document/d/13vKZ9JhB0vO8p2PrMl1x1qfCxh17xJIg_KCIo7HeFok/edit?ts=5a51997d